What is a Crimp Tool? The Complete Guide
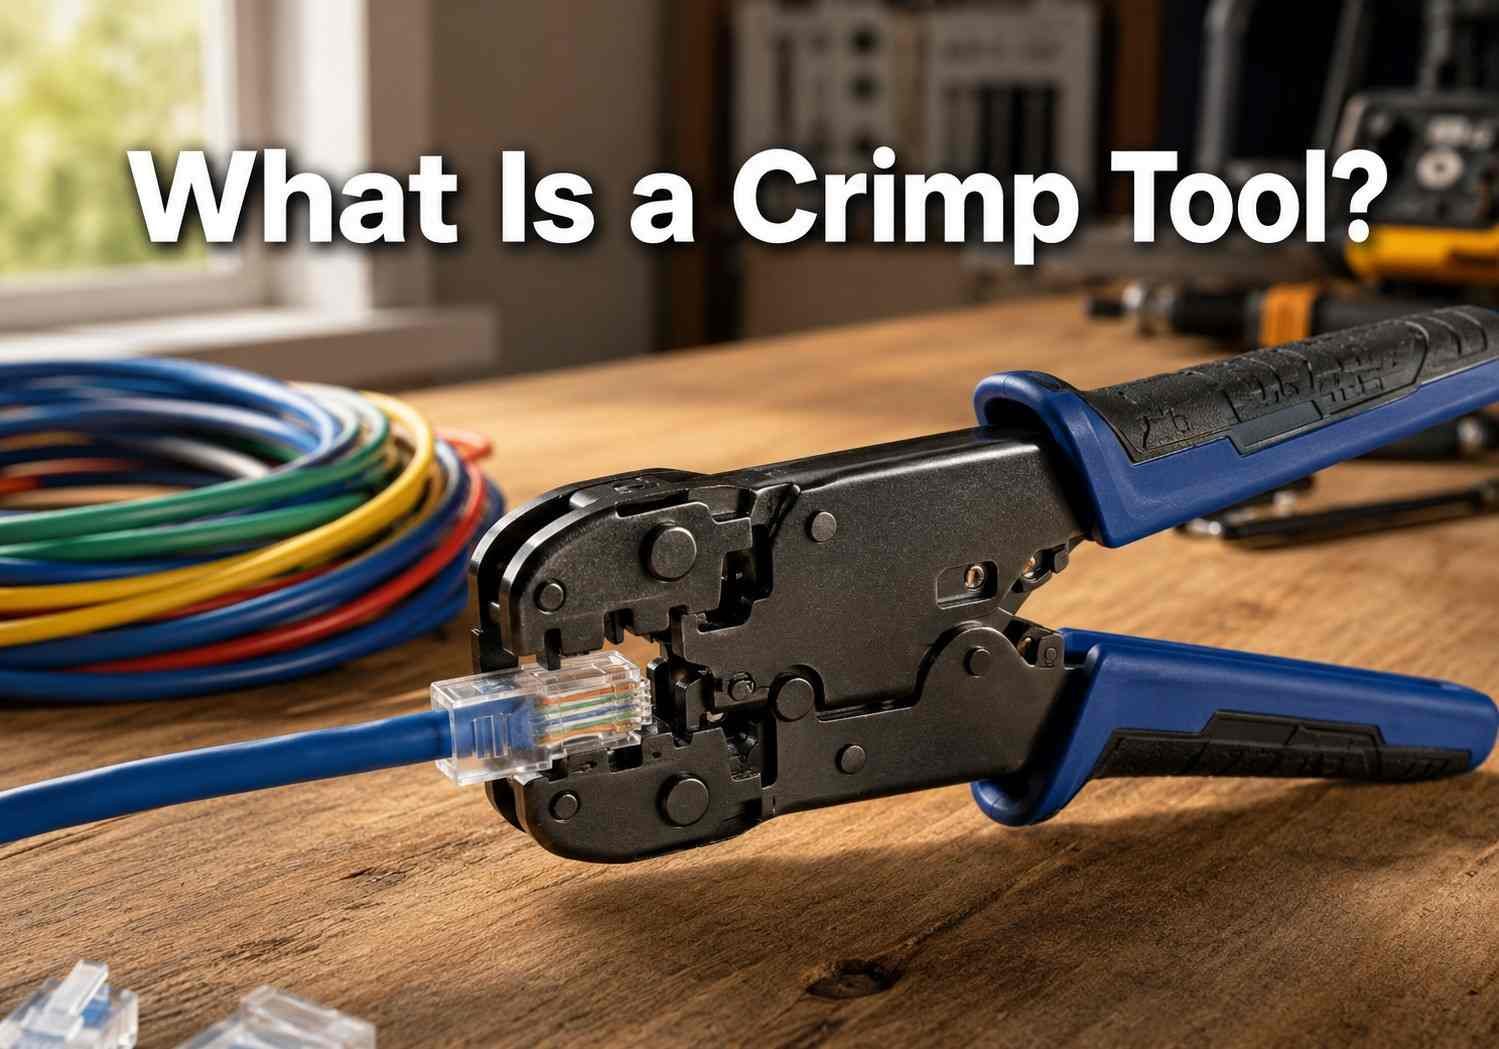
Pick up any network cable behind your router or take a close look at the clasp on a beaded bracelet, and there is a decent chance a small handheld tool made that connection possible. So what is a crimp tool? At its core, it is a device that joins a metal connector to a wire or cable by squeezing it into a tight, permanent shape. No solder, no glue, no heat gun, just pressure applied in exactly the right spot.
People search this term for a surprising number of reasons. Some want to know what a crimp tool is used for in electrical work. Others are asking about a crimping tool in a computer network setup, or they typed “What is a crimp tool in computers?” because a router cable snapped and they need to fix it themselves. Some are trying to figure out what is a crimper for hair, which, spoiler, is a completely different device that happens to share a name. And plenty of people just want to know how to use a crimping tool for jewelry so a bracelet does not fall apart the first week they wear it.
What a Crimp Tool Actually Does
The Simple Version
A crimp tool is used to connect a metal sleeve or terminal to a wire by crimping the metal to secure the wire. After that, the relationship can really be considered forever. No need to wait for cooling/curing as with solder or epoxy or to rely on friction as with the twist-on wire nut.
This isn’t a new technique; there’s a good reason why this never went out of fashion. It doesn’t require an open flame like soldering does, which is important when working with flammable substances or sensitive components. It also does not need a curing window, so the connection is done the moment you release the handles.
What Happens Inside the Jaws
Open up any decent crimping tool and you will find a set of dies shaped to match a specific connector profile. Some are round, some are hex-shaped, and some have an indent pattern. When you squeeze the handles, three things generally happen.
- The jaws close around the connector and force the metal to flow into the gaps between the wire strands, creating what engineers sometimes call a “cold weld,” since no heat is involved at all
- A ratchet mechanism, present on most quality tools, holds the jaws shut until enough pressure has been applied, which stops people from letting go too early and ending up with a loose crimp
- The connector itself changes shape permanently, which is exactly what you want, since a crimp that can be pulled back apart by hand was never done correctly in the first place
Tools without a ratchet rely entirely on how hard your hand happens to squeeze that day, which honestly is not something you want to gamble a network cable or a car’s wiring harness on.
The Metals You Will Run Into
The materials of connectors vary depending on jobs. Copper is everywhere, as it has very good electrical conductivity, thus its use for most electrical and automotive crimps. Brass is used widely in jewelry crimp beads because it will not crack when using small pliers to do beading. Tin plated copper is more likely to be found in marine or outdoor equipment, as it is more resistant to corrosion than untreated copper in the presence of moisture. In some heavy-duty lugs, where weight and material cost are more significant factors, aluminum is used instead.
What Is a Crimping Tool in a Computer Network
Getting Specific About Computers
When someone types What is a crimp tool in computers?, they are almost always dealing with Ethernet cable. A crimp tool in this context attaches an RJ45 plug, or occasionally an RJ11 for phone lines, to the end of a bundle of thin copper wires pulled from inside the cable jacket. Without that step, you just have a coil of loose wire sitting there. The crimp tool is what turns it into something you can actually plug into a router, switch, or wall jack.
Why Networking Pros Actually Use It
The use of a crimping tool in networking goes past just slapping a connector on the end of a cable. Anyone who installs or maintains networks for a living leans on it constantly.
- Custom-length patch cables get built on the spot when a standard six-foot or ten-foot cable will not reach across a rack or around a corner
- Snapped connectors get replaced in the field rather than throwing away an otherwise fine length of cable
- Long cable runs pulled through walls or dropped ceilings during a full office buildout get terminated, one connector at a time
- Wiring gets standardized using the T568A or T568B color code so every single cable in a building follows the exact same pinout, which saves whoever troubleshoots it later a massive headache
A sloppy crimp is one of the more common reasons a network connection drops out randomly, which is exactly why techs test every finished cable before trusting it.
Making Your Own Ethernet Cable
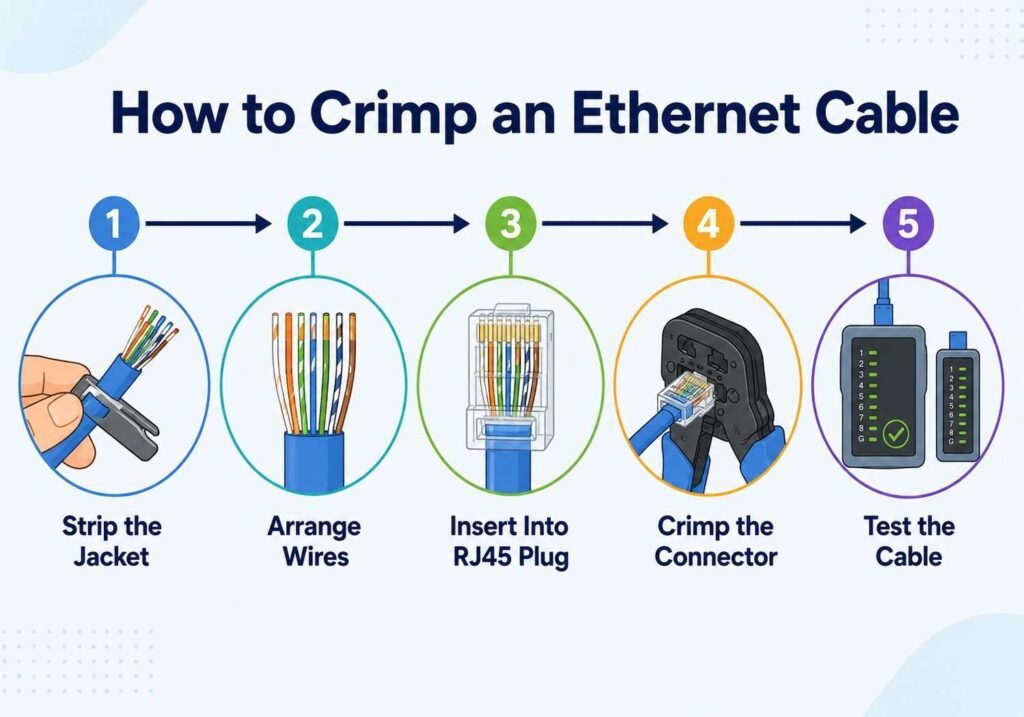
- Strip roughly half an inch of the outer jacket away using the built-in stripper blade most network crimping tools include
- Untwist the eight wires inside and line them up in the correct order based on whichever standard you are following. T568A or T568B
- Trim the ends flush and slide them into an RJ45 plug, making sure every single wire actually reaches the front of its channel
- Push the plug into the tool and squeeze until the ratchet clicks and releases on its own
- Test the finished cable before you install it, since a five-minute test beats tearing open a wall later to find the problem
A Crimping Tools List Worth Actually Bookmarking
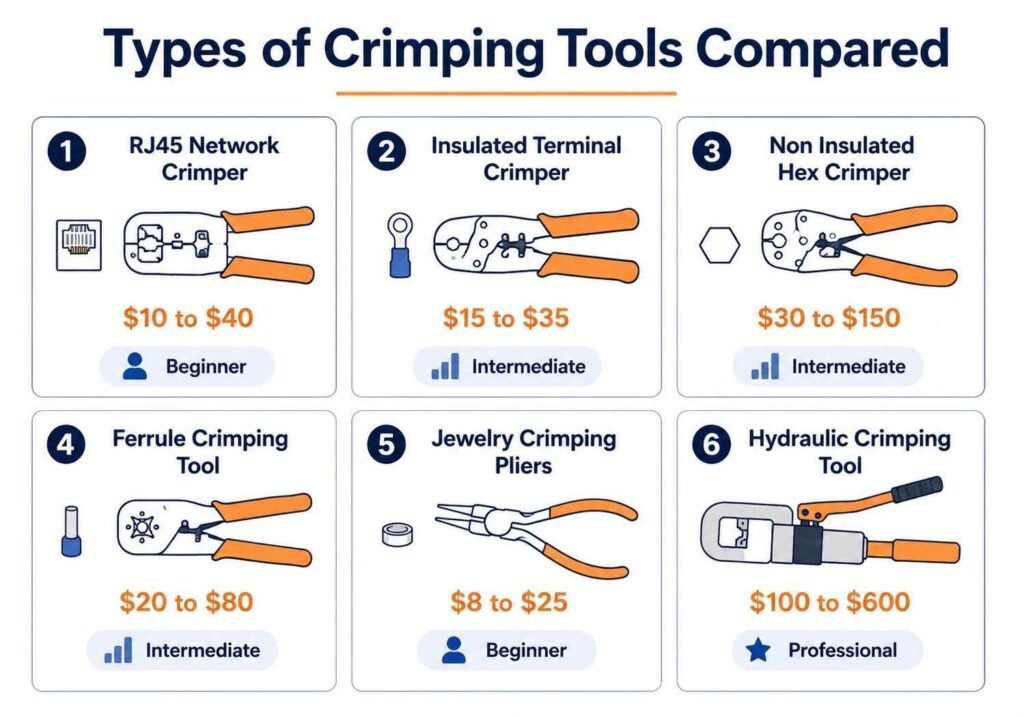
There is no such thing as one crimp tool that handles every job. Jaw shape, pressure level, and connector size all change depending on what you are working on. Here is a crimping tools list organized by what people actually use each one for.
| Tool Type | Main Use | What It Works On | Skill Level | Rough Price |
|---|---|---|---|---|
| RJ45 network crimper | Ethernet cable termination | Copper wire, plastic plugs | Beginner-friendly | 10 to 40 dollars |
| Insulated terminal crimper | General electrical, automotive | Copper wire with plastic sleeved terminals | Beginner-friendly | 15 to 35 dollars |
| Non-insulated hex crimper | Heavy-duty electrical lugs | Bare copper or aluminum terminals | Intermediate to pro | 30 to 150 dollars |
| Ferrule crimping tool | Control panel wire prep | Fine stranded copper | Intermediate | 20 to 80 dollars |
| Jewelry crimping pliers | Securing crimp beads | Brass or silver beads | Beginner-friendly | 8 to 25 dollars |
| Hydraulic crimping tool | Industrial cable work | Thick copper or aluminum cable | Professional | 100 to 600 dollars |
Tools Built for Electrical and Automotive Work
These handle ring terminals, spade connectors, and butt splices for cars, appliances, and home electrical panels. Insulated versions come with a colored plastic sleeve that both protects the joint and hints at which wire gauge it is meant for, usually red for small gauge, blue for medium, and yellow for larger wire.
Tools Built for Control Panels
Ferrule crimpers press a tiny metal sleeve over the exposed strands of a thin wire before it goes into a screw terminal. That small step keeps individual strands from fraying loose, which is a genuinely big deal inside industrial control cabinets, where one stray strand touching the wrong spot can cause a short.
Tools Built for Heavy Cable
Thick cable used in solar setups, heavy machinery, and industrial power runs is simply too tough for hand strength alone. Hydraulic or battery-powered crimping tools apply several tons of force, letting one person make solid, repeatable crimps on cable that would be nearly impossible to compress by hand alone.
What Is a Crimper for Hair, and Why It Has Nothing to Do With Wires
How the Styling Version Actually Works
A crimper for hair is a heated styling tool, not a mechanical one. It uses ridged ceramic plates that press a zigzag pattern into small sections of hair. Heat temporarily loosens the internal bonds in each strand, and the ridged shape of the plates holds that wave pattern as the hair cools back down, which is where the classic crimped look comes from, especially the style tied to 1980s hair trends.
Where the Confusion Comes From
The overlap in naming is really the only thing these two tools share. Both use the word “crimp” because, in a general sense, crimping just means pressing a pattern into something using pressure.
- A wire or network crimping tool relies purely on mechanical pressure and produces a permanent electrical connection that is not going anywhere
- A hair crimper relies on heat plus pressure and produces a temporary cosmetic wave that comes right out the next time you wash or brush your hair
- One is worked by hand using dies and takes real hand strength, while the other plugs into an outlet and gets hot enough to burn skin if handled carelessly
If you searched for wiring help and somehow ended up on a hair styling page, or the reverse, this shared word is almost always the culprit.
How to Use a Crimping Tool for Jewelry, Start to Finish
Jewelry makers rely on tiny crimp beads, which are small metal tubes, to secure beading wire or cord onto clasps without tying a single knot. Here is how to use a crimping tool for jewelry from beginning to end.
What You Will Need
You need beading wire or tigertail cord, crimp beads sized to match your wire’s thickness, a pair of proper jewelry crimping pliers with two notches, one round and one crescent-shaped, a set of flush cutters, and whatever clasp or finding you plan to attach.
The Process Itself
- Thread the wire through the crimp bead, then through the loop on the clasp, then back down through that same crimp bead
- Pull the wire so the bead sits close to the clasp but still leaves a tiny loop for movement, since a crimp pulled too tight will make the clasp sit stiff and awkward
- Set the bead in the back, round notch of the pliers and squeeze once to flatten it into a U shape, which separates the two wire strands running through it
- Move the flattened bead into the front, crescent notch and squeeze again to fold that U shape into a smooth, rounded cylinder
- Give the clasp a firm tug to check that the crimp holds, then trim off any leftover wire with the flush cutters
Mistakes People Make Constantly
A lot of jewelry crimps fail for the same handful of reasons. Someone grabs a plain pair of pliers instead of real crimping pliers. That flattens the bead unevenly and leaves it weak. Someone picks a crimp bead that does not match their wire gauge. It ends up too loose to grip or impossible to close all the way. Someone skips the second, rounding step entirely. That leaves sharp edges behind, and they can cut a finger or snag on a sweater sleeve. Someone forgets to leave any slack before crimping. That locks the clasp into a stiff position, and it never sits naturally against the skin.
What Is the Purpose of a Crimping Tool, Really
Making Connections That Actually Last
The real purpose of a crimping tool comes down to reliability. A properly finished crimp forms a tight seal between two metal surfaces that keeps out moisture and air, which is exactly what causes corrosion over time. That seal is also what lets a crimped joint shrug off vibration and pulling force far better than a lot of alternative connection methods.
Why It Beats Soldering for Most Jobs
Crimping wins on speed because there is no warm-up time and no cooling time. And no flux or solder to run out of mid-job. In places doing high-volume work, like automotive assembly lines or cable manufacturing plants, that time savings adds up fast across thousands of connections a day. There is no open flame or hot iron needed, which makes a job site safer. There are no toxic fumes from melted solder. And crimped joints can be made in cramped, awkward spots where a soldering iron would never fit comfortably in the first place.
Who Actually Relies on This
Telecommunications and IT teams use crimping constantly for structured network cabling. Automotive manufacturers build entire wiring harnesses around it. Aerospace engineers depend on it because connection failure at altitude is not something you get a second chance at. Renewable energy installers use it heavily on solar panels and battery banks. And jewelry makers use a much smaller, gentler version of the same idea to finish beaded and wire-wrapped pieces by hand.
If you want a deeper technical breakdown, Wikipedia’s entry on crimp connections covers the engineering side well. If you would rather watch someone do it than read about it, YouTube has plenty of full-length tutorials walking through the process step by step.
Conclusion
A crimp tool is one of those things that looks simple but shows up everywhere once you start paying attention to it, from the cable running behind your desk to the clasp on a bracelet someone made by hand. Three things are worth holding onto. Crimping creates a permanent bond using pressure alone, with no heat required.
The right tool depends entirely on your project, such as a network crimper or an electrical crimper. And jewelry pliers cannot stand in for each other. And a hair crimper is really just a heated styling iron that has nothing to do with wire work despite sharing the name. If you are about to buy your first one, match the tool to your actual project and look for a ratcheting mechanism. If you are working with wire or cable, always test a couple of practice crimps before trusting one in a finished piece.
FAQ
What is a crimp tool used for?
It mechanically presses a metal connector onto a wire, forming a strong, durable bond. It’s used in networking, electrical work, car repairs, and jewelry making as an alternative to soldering.
What is a crimping tool in a computer network?
It attaches RJ45 or RJ11 connectors to Ethernet or telephone cable ends, letting the cable plug into a router, switch, or wall socket. It’s essential for wiring a home or office network.
What is a crimper for hair?
It’s a heated styling tool with ridged ceramic plates that press a zigzag wave into hair using heat, not pressure. Despite the name, it has no real connection to wire crimping tools.
How do you use a crimping tool for jewelry?
Thread wire through a crimp bead and clasp, then back through the bead. Flatten the bead in the pliers’ round notch, round it off in the crescent notch, then trim the excess wire.
What is the purpose of a crimping tool?
It creates a permanent, reliable wire-to-connector bond without heat or solder. The tight seal resists corrosion, vibration, and pulling, making it faster and often more durable.
Is crimping better than soldering?
Usually, yes. It’s faster, safer, and more consistent for large jobs with no warm-up time. Soldering can be stronger in low-vibration situations, but crimping wins for field repairs and mass production.
What are the main types of crimping tools?
Main types include network crimpers, insulated and non-insulated electrical terminal crimpers, ferrule crimpers, hydraulic crimpers for heavy cable, and jewelry crimping pliers. Each uses dies shaped for its specific connector.
Can I use a regular plier instead of a crimping tool?
Not really. A regular plier won’t shape the connector correctly and usually leaves a weak or uneven crimp. Proper crimping tools use dies matched exactly to the connector profile.