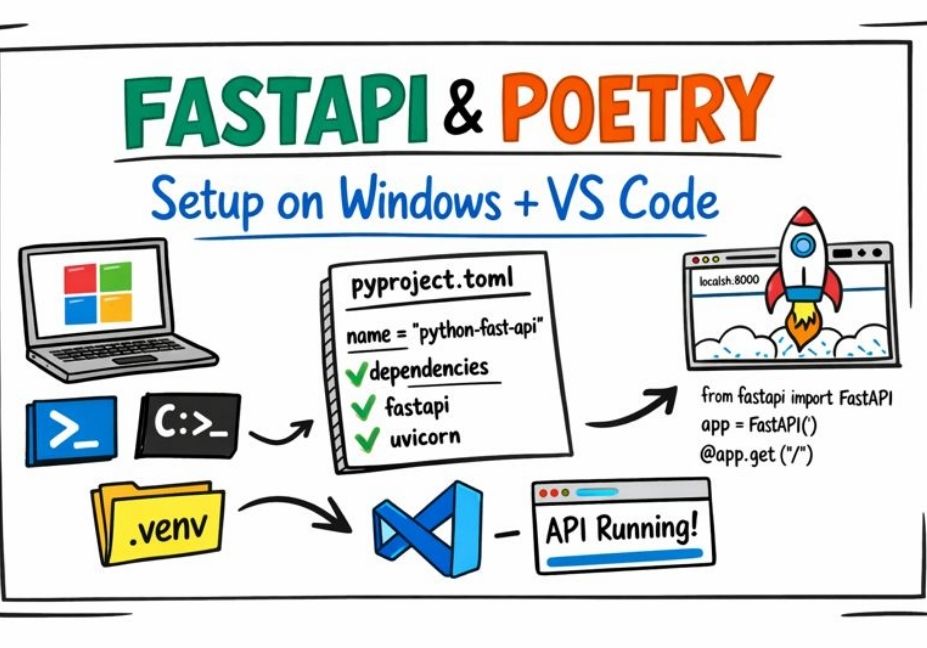
Install Poetry on Windows (PowerShell/CMD) and Build a FastAPI Project in VS Code — Step by Step
Poetry has become one of the easiest and cleanest ways to manage Python dependencies, virtual environments, and reproducible builds. If you’re building APIs with FastAPI, using Poetry keeps your project organized and makes setup consistent across machines—especially when you’re working in VS Code.
In this guide, you’ll install Poetry on Windows (PowerShell/CMD), create a FastAPI project using pyproject.toml, set up a local .venv for VS Code, install dependencies, and run your API using Uvicorn. Everything is written to match your project path:C:\Users\Azhar Computer\python-fast-api
|| Also read Also read Build a Data-Science–Powered SaaS That Scales in 2026
What you’ll build
- Poetry installed and working on Windows
- A FastAPI app inside
app/main.py - Dependencies managed via
pyproject.toml+poetry.lock - A local virtual environment
.venvthat VS Code can detect - A running development server with auto-reload
Prerequisites
- Python 3.9+ installed on Windows
- VS Code installed + Python extension
- Your folder already exists:
C:\Users\Azhar Computer\python-fast-api - You already created
pyproject.tomlusingpoetry init
Step-by-step commands (and where to run them)
Step 1 — Install Poetry (one-time)
Where to run: PowerShell (recommended) OR VS Code Terminal (PowerShell)
(Invoke-WebRequest -Uri https://install.python-poetry.org -UseBasicParsing).Content | py -
Close and reopen terminal, then verify:
poetry --version
If
poetryis not recognized, you likely need to add Poetry to PATH. Add:%APPDATA%\Python\Scriptsto User PATH, then reopen terminal.
Step 2 — Open your project in VS Code
Where to do this: VS Code (GUI)
- Open VS Code
- File → Open Folder
- Select:
C:\Users\Azhar Computer\python-fast-api
Step 3 — Go to your project folder in terminal
Where to run: VS Code Terminal (PowerShell) (best)
cd "C:\Users\Azhar Computer\python-fast-api"
dir
You should see pyproject.toml.
Step 4 — Make Poetry create .venv inside the project (recommended for VS Code)
Where to run: VS Code Terminal (PowerShell)
poetry config virtualenvs.in-project true --local
This helps VS Code automatically detect the correct interpreter at:.venv\Scripts\python.exe
Step 5 — Add FastAPI and Uvicorn
Where to run: VS Code Terminal (PowerShell)
poetry add fastapi "uvicorn[standard]"
This updates:
pyproject.tomlpoetry.lock
Step 6 — Install dependencies from poetry.lock
Where to run: VS Code Terminal (PowerShell)
Option A (recommended for many FastAPI apps): install dependencies only
poetry install --no-root
Option B: install dependencies + install your project package
poetry install
Which one should you use?
- Use
--no-rootif your project is just an app and you don’t need to install it as a package. - Use normal
poetry installif you want your project installed into the environment as a package.
Step 7 — Create your FastAPI app file
Where to do: VS Code (Explorer + Editor)
Create this structure:
python-fast-api/
  pyproject.toml
  app/
    main.py
Put this code in app/main.py:
from fastapi import FastAPI

app = FastAPI()

@app.get("/")
def root():
    return {"ok": True}
Important: Don’t name any file fastapi.py (it will clash with the FastAPI package import).
Step 8 — Run the development server
Where to run: VS Code Terminal (PowerShell)
poetry run uvicorn app.main:app --reload
Now open:
- App: http://127.0.0.1:8000
- Docs: http://127.0.0.1:8000/docs
Stop server:
- Press Ctrl + C in the terminal
|| Also read Advanced AI and Data Science Roadmap for Job-Ready Professionals (2026 Guide)
Step 9 — Select the correct Python interpreter in VS Code
Where to do: VS Code (GUI)
- Press Ctrl + Shift + P
- Choose Python: Select Interpreter
- Select:
C:\Users\Azhar Computer\python-fast-api\.venv\Scripts\python.exe
Now VS Code will:
- resolve imports correctly
- run/debug using the same environment
- show correct linting and IntelliSense
Conclusion
With Poetry installed on Windows and your .venv created inside the project, you now have a clean, repeatable FastAPI setup that works smoothly in VS Code. From here, you can add MongoDB support, environment variables, routers, and production deployment tools while keeping your dependencies locked and predictable via poetry.lock.
FAQs
1) What’s the difference between poetry install and poetry install --no-root?
poetry installinstalls dependencies and installs your project as a package.poetry install --no-rootinstalls only dependencies (common for app-style FastAPI projects).
2) Why should I use .venv inside the project?
It makes VS Code interpreter detection easier and keeps your environment contained per project. No confusion with global virtualenvs.
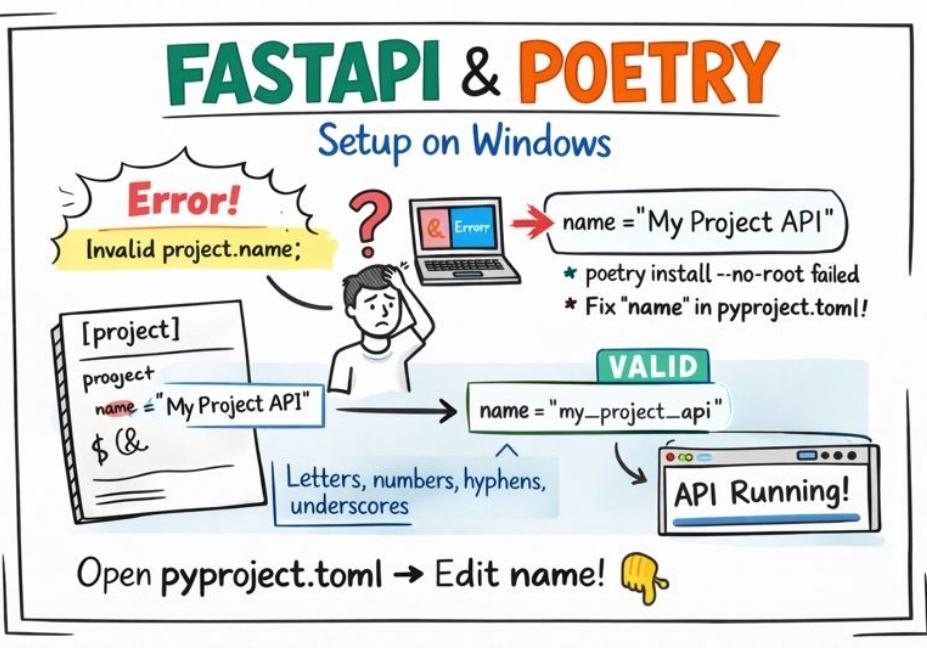
3) I got an error: “project.name must match pattern…”
Your pyproject.toml name likely has spaces or invalid characters. Use a valid name like:python-fast-api, python_fast_api, my-api.
4) Where should I run these commands: CMD or PowerShell?
You can use either, but the smoothest workflow is:
- VS Code Terminal (PowerShell) for most commands
- PowerShell for installing Poetry (official installer command)
5) How do I check which packages are installed?
Run:
poetry show